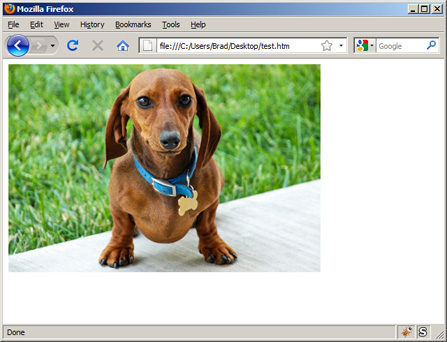
As you recall from Lesson 1 (What is HTML?), adding a paragraph in HTML is as simple as wrapping text in <p> and </p> tags. Adding an image, however, is a little more complicated.
Follow Along
Before we continue, I encourage you to follow along by copying and pasting today’s code into your own HTML document (or the page we created in Lesson 2: How To Create and Save Your First HTML File by Hand). This will allow you to edit the text, and refresh the file in your web browser as we make edits. This will greatly enhance your learning ability.
A Funny Dog

Let’s pretend we have an image of a dog on our computer saved as “funny-dog.jpg” and we want to insert it into a webpage; this is the code we would use:
<img src="funny-dog.jpg">
Let’s analyze this code. First, <img> is the code for creating an image element. Next, the letters “src” are used as an attribute (which you learned about in Lesson 3: Attributes and Values) and stand for “source”. Basically, we need to provide the web browser with a value to the source of the image. Naturally, the value for the source attribute is “funny-dog.jpg”. This example assumes your image file is located in the same directory as your HTML file. If, for example, you had your image file inside a folder named “images” your code would look like this:
<img src="images/funny-dog.jpg">
Self Closing Elements
As you can see, in both code examples so far there has not been an ending </img> tag, because the image code is a “self closing” element. This is because unlike a paragraph, we won’t have a plethora of content inside our <img> element, but rather a single image. In fact, HTML5 does not require us to ever “close” our elements, but for organizational reasons I recommend including traditional closing tags for most elements.
There is one additional bit of code we must add before we are finished. We must assign an “alt” attribute and value to our image. The “alt” attribute stands for “alternative” and is used to provide a text-based alternative for viewers incase the image will not load, or if they are visually impaired. Here is what our code will look like:
<img src="funny-dog.jpg" alt="A funny dog sitting on the grass.">

That’s it!
If you prefer to watch video lessons instead of reading written lessons check out my 8 hour video course and learn pro-level HTML, CSS, and responsive design.


Thanks for your help! I’m still struggling with the editing of a theme, but this helped me with imgs.
Hiya thanks for the tutorial. One question, how can I change the size of the images? I just put one on and it’s massive!
Is this theme for free? I want this theme too! BTW. Thank you for your blog.I learn a lot from it!
These lessons have been so helpful cause I am learning how to design a website.
Thanx
Sure, it did work. I love it.
Thanks you so much!!!! Keep up Serving!
Hello Brad,
You’ve been extremely helpful over the years. In adding images to HTML, it’s been successful ever since – that’s if I’m connected to the Internet.
However, can’t I get to see the image I added to the HTML doc without getting on the net?
You dont have to connect to the net to view your HTML doc, just make sure your HTML files and images folder are in the same directory.
Thanks for sharing it was very helpful!
thanks man i have just inserted images on ma webpage
OK so i managed to put up some images onto my work in progress. How do i control where about i put them? I want one to sit on the right of a few dot points but i can only put it below, above or between each of them where as I’m aiming to get NEXT to them. Any tips?
Hi Tasman, if you want the image to sit next to other content (to the right) you’ll want to learn about CSS Floats. I have a YouTube video that explains floats here.
Hi,
I’ve just started learning HTML with your great lessons. I have an issue with linking two pages. The link does not work. I work on Mac and tried many times to solve this with no success. Appreciated!
Hi, do your page names use hyphens instead of spaces? So for example “new-page.html” instead of “new page.html”
Aside from not using spaces in file names, the next thing I can think of is to pay extra attention to the folder/directory structure. Are the two pages you are linking in the same folder?
THank you so much you have helped me alot.
if the html document in folder
c:\web\html\world.html
and image in folder
d:\image\dog\funnydog.jpeg
so how to add this image to above html doc
thanks
janaka
That’s a good question. If the image folder is not on the same hard drive (or partition) as the HTML folder that will be tricky. If possible, I’d recommend creating a folder named “images” that sits in the same “html” folder that your “world.html” exists within. Or at the very least, create an “image” folder that sits at the root of the “C” drive just like your “web” folder does. Then, you could reference the image with the “src” attribute with this value “../../image/dog/funnydog.jpeg” – Do you plan on eventually moving your web page to a web-host so the world can view your page? Or is this page only for personal use on your computer? If you want to place the page online eventually you’ll want to make sure the “images” folder is closer to the HTML file.
Now my doubts are clear related to inserting imagesnin HTML documents. Thank you for help!
Hello, Thank you, for your lessons for html code. I am totally blind, and I was able to post my picture with your clear instructions. Thanks again!
Wahoo!! that’s really cool soon to start
Thanks man you have made my life easier
moving up to lesson 5
Thank you for you lecture
waow, this is the best ever since I began searching for how to add an image in HTML, but to no avail, but now I’ve done it, thanks alot
thank you so much! it’s helps me a lot!
finally, I got it!
Nice but what about the size can we change it.
I love your lesson this is great kind of learning.