Today we are going to write and save our first CSS file. Let’s begin by opening a text editing program. If you are on a Microsoft Windows PC open the program named Notepad (hold down the Windows Key on your keyboard and press R, then type notepad and press enter). If you are using a Macintosh computer, launch the application named “TextEdit” (which can be found in your Apps folder).
Let’s Write Our First Bit of CSS
Let’s imagine we have a simple web page with a heading, and we want the heading to be orange and center aligned. Add the following code into your new blank text document:
h1 {
color: orange;
text-align: center;
}
Hopefully, you remember this code from our previous lesson. The task for today is to save our CSS file and link it to an HTML page.
Step 1: Saving The CSS File
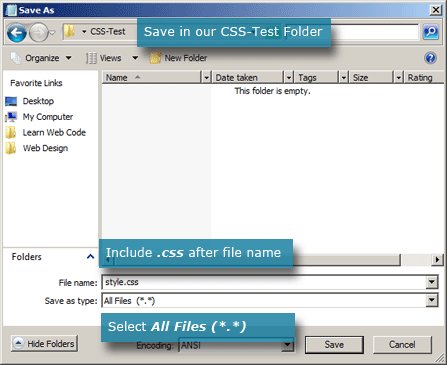
Create a new folder on your desktop (or another location you prefer) and name it CSS-Test. Now, back in your text editing program save your document as “style.css”.
Linking CSS File to an HTML Page
Our new CSS file is worthless if we don’t apply it to a web page. Let’s create a quick HTML page for this lesson. Create a new blank file in Notepad (or TextEdit) and add the following code:
<!DOCTYPE html>

<html>
<head>
<meta charset="utf-8">
<title>CSS-Test</title>
</head>
<body>

<h1>CSS-Test</h1>

<div id="box-one">
<p>This is box one.</p>
</div>

<div id="box-two">
<p>This is box two.</p>
</div>

</body>
</html>
If you’ve read my first few HTML Lessons, then this code is at least somewhat familiar. I’ll explain it as the lesson continues; for now save this document in our “CSS-Test” folder and name it “index.htm”.

Linking the Two Files Together
We still need to tell the web browser to load our “style.css” file when the “index.htm” page is viewed. Add the following code to “index.htm” directly above our </head> closing tag:
<link rel="stylesheet" href="style.css">
This line of code tells our browser that we want to link a Style Sheet, that it’s located in the same folder as our HTML page, and that it’s named “style.css”.
Now, when you view “index.htm” page in a web browser you should see a centered, orange heading:

Let’s Style Those Two Boxes
If you look at the code of our HTML page, you’ll see two <div> elements. We added an HTML attribute of “id” for these two elements and assigned them values of “box-one” and “box-two.” We can use an element’s “id” to select and style it with CSS. For example, let’s make the first box gray, and the second box yellow. Add the following code to your CSS file, directly below our original <h1> rule:
#box-one {
background-color: gray;
}

#box-two {
background-color: yellow;
padding: 10px;
}
When an element has an “id” we can access it with a CSS selector by placing a pound sign (#) in front of it’s id value. So to select the first <div> element we simply type “#box-one” and then begin our CSS Rule.
Our New Fancy Boxes
When you save your CSS file and refresh our HTML page in a web browser you should see something very similar to this:

Yay For Style
It may not be beautiful, but we styled our first HTML page with CSS! Let’s recap your CSS knowledge so far. You know:
- The basic syntax of CSS (covered in our previous lesson)
- How to link a CSS file to an HTML page
- How to select certain HTML elements and style them
In our next lesson we’ll continue learning about CSS Selectors and the different ways to target specific elements with your CSS.
If you prefer to watch video lessons instead of reading written lessons check out my 8 hour video course and join 4,000+ others who have learned pro-level HTML, CSS, and responsive design.


I am currently going to school online at the Art Institute for Web Design/ Interactive Media. I have only been working with HTML and CSS code for a couple of months now, and your tutorials have really helped me so much man, I really just wanted to take this opportunity to thank you for posting such great tutorials, and making everything really easy to understand. Every sense I have found your Web site last week,I have been religiously referencing back to your site for help, and it has made my online experience with Coding a hell of a lot easier. (lol) I even go as far as leaving your site open in my Task Bar constantly for quick reference. Thanks you so much buddy, your work is very appreciated.- Norton
I wrote and was trying to save my first CSS file today. I’m using TextEdit. When I tried to save it in plain text format as “style.css”, I got the following message… “You cannot save this document with extension “.css” at the end of the name. The required extension is “.txt”. You can choose both, so that your file name ends in “.css.txt”.” How do I proceed? Thank you!
Hi Patricia,
While in TextEdit look in the top OS X menu bar for “Format.” Once you click “Format” there should be an option to “Make Plain Text.” That should do the trick – saving the file with a .css extension should now work.
The keyboard shortcut to switch to plain text is Command+Shift+T.
Thanks for this helpful tutorial Brad!
Why create separate file for CSS and then link it to html when there is a possibility to make it all together in same file?
I don’t try to suggest, because I’m just beginner , but as I sow in other html and css tutorials, there was a way to do css and html in same field and it was way easier for me to understand. Thank you.
Hi Giorgi,
That is a great question. It may be simpler to include the CSS code within the HTML page when you are learning, but I like to get people started on the right foot from the very start. I want to get you in the habit of keeping your CSS in a separate file because it is the industry standard.
The key concept is “separation of presentation and content.”
Think of it this way: Imagine you have a website that has 50 or 100 pages and you want to change the background color. If we keep our CSS in a separate file we can make a change to one file and the background color will change for all 100 pages. If you keep the CSS code in the HTML file then you would need to edit 100 files.
Another example: Imagine all of your CSS code is about 10 kilobytes of data. Imagine a user visits your site and views 15 different pages. If you include the CSS in your HTML file they would be re-downloading the same 10 kilobytes of CSS data 15 times! If we keep our CSS in a separate file they would only need to download it once.
I have been studied an html lesson at volcano web and w3 school. Your css lesson give me a good practice and amazing knowledge for me. Thanks, dude.
Striving to be self-taught CSS/HTML proficient. Officially going to use your site for both, until I run out of lessons! Was seriously considering going to school for this since it seemed so daunting. Thanks for saving me from a $40K college education debt 😉
Much respect for sharing the knowledge Brad
I have found this tutorial wonderful, God bless you.
Thanks
Yeah, I am old school and still stuck on HTML going back to the old days of Geocities, if anyone remembers that. It was a free web host in the 90s. I have put off learning CSS for a long time. I am tired of going back and editing each individual page one at a time in all of my stuff on the net. Just changing a simple footer is a lot of work. I like how your lessons are very very simple, and takes your hand and slowly walks everyone through it step by step. I just found this site a couple of weeks ago. Wish it would have been earlier. It has helped me finally understand the concept of CSS. I have CSS for Dummies but still didn’t get it. I haven’t become an expert by any means in two weeks, but I am just excited to be learning.
Thanks , Drew F.
Your tutotrials help me more than you can think of.
Thanks alot.
I am working as a trainiee in a wed designing company and this tutorial gives a lot of information to me thank you
I’m taking a web class right now and I found the book hard to follow. I ran across your site and it is great!
I was wondering if you had any lessons showing diagrams inserted on both web page and the .css file.
Thank you,
Tee
This site is very helpfull for me. keep continue the sharing of your best knowladge about designing.
Thanks.
Jay Hind
Am a fresh student at school offering foundation of web programing,this site is great and good for me to learn thanks Brad
This has been really helpful to me. I have been looking for info about linking a CSS style sheet to my html documents, and this is the very best web i’ve found. Thank you very much Brad.
thank you very much Brad
It’s really useful for me.
This is a great and helpful tutorial that makes things way more clear to any tech noob. Thanks Brad, you are cool in my book.
If any of you folks wanna learn how to code easily with free classes then go to http://www.codecademy.com … I was playing SWTOR online the other day grinding it up and talking to a new friend and I asked him if it’s easy to become an I.T. type of dude, and he said,”it is with websites like this”, then BAM! Before I knew it, I had learned HTML, CSS, and Bootstrap all in 1 day!!! It takes some people months or years to learn that, I learned it in a friggin day, not trying to toot my own horn, but then again I am pretty dang smart, well that and lots of coffee, BUT the bottom line is If I can do it, then you can do it too. Then today I found THIS awesome site -Brad’s site- which is very helpful and explains it in a precise and comprehensible way, not to mention it’s not very time consuming. Good luck all, and no I’m not advertising for these people for money, I just believe in good karma. Long story short, after a few hours of realizing that I love to code, I got in contact with my old best friend and he hooked me up with lots of rich tech info… Good times. Take it easy, munchkins… Contact me for any questions or for my newly found wealth of code info at Wyattm311@gmail.com and Brad, *air pound it*!
its helpful keep it on
Thanks man, I no longer have an issue with this.
in fact I don’t think we can get another online tutor like You.
your tutorial differ from others, in term of starting from scratch to the professional stage.
thanks
I really love your tutorials…. THANKS A LOT
Dear LearnWebCode,
You fill me with inspiration, and you could’ve made me rich. Unfortunately, I am only a kid but you’ve filled me with inspiration to become a web developer. So when I get rich, I owe 10% to you.
Haha, that’s awesome to hear! How about you keep 100% but keep me updated on your progress 🙂
Thank you a lot
I didn’t know the how to keep styleheet in a separate file and wasn’t aware of linking it to the html document. Also i didn’t knew the importance of doing it your comment to Giorgi Pilpani opened my eyes. thanks man